(5b) The Cross Staff
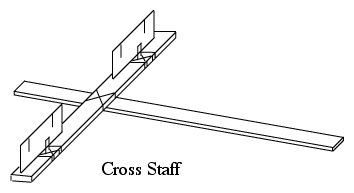
![[IMAGE: The Cross Staff]](Sfigs/Crostaf1.gif)
The device was apparently invented by Rabbi Levi ben Gershon (1288-1344), a Jewish scholar who lived in Provence, in southern France, also referred to as "Gersonides." It is described in his Hebrew "Book of the Wars of the LORD," also translated to Latin; the name is borrowed from an ancient book whose only surviving trace is a casual reference in the bible, Book of Numbers, ch. 21, v. 14. Claudius Ptolemy lived more than 1000 years earlier, so the drawing on top indeed takes considerable artistic license.
Astronomers used the cross-staff for measuring the angle between the directions of two stars. Other, older instruments for this purpose existed, used by scholars such as Hipparchos and Ptolemy, but none was as portable, which made the cross-staff eminently suitable for navigation at sea. Ships' officers used it to measure the elevation angle of the noontime Sun above the horizon, which allowed them to estimate their latitude (see section on navigation). The problem of getting dazzled by the Sun later led to the invention of the backstaff (pictured below on the left) where the sunlight fell onto a target, not into the eye. Columbus may well have used one. This was greatly improved around 1594 by Captain John Davis, so perhaps the "Mayflower" used the upgraded design.
To measure the angle between two stars, an astronomer would place the staff just below one eye (drawing) and slide the cross-piece up and down. The cross-piece would have a pair of open sights sticking out perpendicular to the drawing at symmetric locations such as B and B' (often several pairs of sights, some spaced further apart than others). The astronomer would slide the cross-piece up and down, until sight B covered one of the stars and sight B' the other. For use at night, slits make convenient sights (see below).
![[IMAGE: The Backstaff]](Sfigs/backstaf.gif) After that was achieved, the instrument would be lowered and the distance AC would be measured. Then if A was the angle between the staff and the direction of one star, from the definition of the tangent
After that was achieved, the instrument would be lowered and the distance AC would be measured. Then if A was the angle between the staff and the direction of one star, from the definition of the tangent
tanA = BC/AC
The distance BC between the sight and the stick was already known to the astronomer--so, using a table of tangents, the angle denoted by A could be calculated. Since the instrument was symmetric, the angle between the directions of the stars was 2A.
|
Building your own Cross-Staff
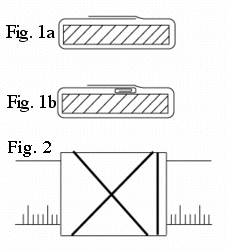
 You can build the simple cross-staff shown on the right, using no more than a yardstick, an office ruler and simple materials found in the home. All measurements here are in inches, but if your system is metric, you may use a meter-stick and a 30-cm ruler, and estimate equivalents of other dimensions. In either case, feel free to improvise, modify the design and perhaps improve it.
The materials:
- A wooden yardstick
- A wooden 1-foot ruler
- A piece of wood to serve as cross-piece,
about the size of the ruler
(a 2nd ruler is OK too).
- A thick paper (manila) folder, which will be cut up.
- (Optional) An empty cardboard box from
cereal, frozen food, etc., with a glossy
side. If not available, cardboard from
the manila folder may be used.
- 4-6 rubber bands
- A stapler
- Two paper clips, and some paper.

|
|
To use the cross-staff, start by sliding the cross-piece to about the middle of the yardstick. Sight the yardstick along the line halfway between the stars whose separation you want to measure, then place the two sliders on the cross-piece so that the slits are approximately where the stars are located. Finally, adjust the yardstick slider until you see both stars flash simultaneously in both slits.
If that is too hard, try working with wider slits, such as 1/4" wide. Like all astronomy measurements, these too are best performed under a dark sky, with your eye used to the darkness. With a sky lit up by city lights or moonlight, you might find that you can only conduct measurements on bright stars.
When you are satisfied that you have got both stars simultaneously in the slits, take down the cross staff and measure the distance B'B using your ruler.
In the drawing at the start of this web page, the stick is exactly in the middle (CB = CB'), but do not worry if the distances do not turn out equal. Just measure the distance BB' and assume the stick is right in the middle.
If the stars are very close, use the inner pair of slits and/or move the cross-piece further away on the stick. If they are widely apart, use the outer pair and perhaps go closer to the eye. Of course, use just one eye and close the other.
The rest is just a calculation of inverse tangents.
Questions from Users:
***
Altitude of the tail of the Big Dipper
|
Next Stop: #5c. Coordinates
Timeline
Glossary
Back to the Master List
Author and Curator: Dr. David P. Stern
Mail to Dr.Stern: stargaze("at" symbol)phy6.org .
Last updated: 9-17-2003
|